You are here
Electronic Fax Service (eFax)
As part of the modernization of Pitt’s telephone infrastructure, Pitt Information Technology has launched an Electronic Fax Service (eFax) to replace analog fax machines in University departments. eFax consists of two related services: sending outgoing fax messages and receiving incoming fax messages.
Benefits
- Simple: Use your Pitt Email to send outgoing fax messages
- Flexible: Send fax messages from anywhere
- Secure: Messages sent and received through eFax are secured with TLS encryption
- Sustainable: Reduce paper waste and electricity consumption
- Cost-effective: Eliminate the cost of purchasing and maintaining standalone fax devices
Send Outgoing Faxes (Faculty and Staff)
University faculty and staff with an @pitt.edu email address can send faxes at no cost from any device that they use to send email messages. To send a fax via email, start a new message in your email client and follow these steps:
1. In the To: field, enter the fax number to which you are sending followed by @fax.pitt.edu (for example, 4125555555@fax.pitt.edu).
- For international faxes, enter the fax number in this format:
+[country code][phone number]@fax.pitt.edu
2. Type the subject of your fax in the Subject: field.
3. Add your fax message as an attachment or type a message into the body of the email.
4. Click Send.
Notes:
- A message-only fax can be sent by simply typing a subject and a message in the body of the email.
- Outgoing faxes can still be scanned and sent from a Ricoh printer using a slightly different procedure (select Scan to Email, enter the ten-digit fax number followed by @fax.pitt.edu, then press Enter).
- Supported attachment types are text (DOC, PDF, TXT), spreadsheets (XLS, XLSX), presentations (PPT), graphics (JPEG, GIF, TIFF, BMP, PNG), web content (HTM and HTML but not JavaScript), and print (PS, PCL).
Receive Incoming Faxes (Departments)
Departments with standalone fax devices can have incoming fax messages delivered as a PDF attachment to the email address they specify. Pitt IT will contact departments to begin the process of transitioning your analog fax machines to eFax. If you prefer to get started right away, contact the Technology Help Desk to request an early migration.
Departments are charged a flat rate of $14 per month, per fax number for eFax. Unlike in the previous fax model, departments are not charged usage fees for incoming or outgoing faxes.
To prepare for your department's migration, complete these steps:
- Submit a list of the incoming fax numbers your unit uses to Pitt IT via the Voice and Data Services Request form. A Pitt IT analyst will follow up to review the fax numbers, discuss email delivery options, provide billing details, and answer your questions.
- For each of your department's fax numbers, decide what email address you would like to use for incoming fax messages. Fax messages can be delivered to an individual address, a shared resource account address, or an email address associated with a Microsoft Teams channel or Microsoft 365 Group. Provide this information to the Pitt IT analyst who is working with your department.
- Note: Teams channels and Microsoft 365 Groups provide the most flexibility because multiple people can be added to a channel or group. This ensures one person is not solely responsible for managing fax messages. In addition, it is easy to add or remove individuals from the channel or group in response to staffing changes. See the steps below for using an email address associated with a Teams channel or Microsoft 365 Group.
Use a Teams Channel Email Address for Incoming Fax Messages
Use the Email Address of an Existing Teams Channel
Follow these steps to find the email address of an existing Microsoft Teams channel:
-
Open Microsoft Teams.
- Navigate to the Team you want to use.
- Navigate to the Teams channel in the Channel list and right-click on it.
- Select Get email address.
- Provide the email address to Pitt IT along with the incoming fax number it should be associated with.
Create a New Teams Channel and Use Its Email Address
Follow these steps to create a new Teams channel and get its email address:
1. Open Microsoft Teams and navigate to the Team where you want to create the channel.
- Note: If you do not have an existing Team, you can create a new Team using these steps.
2. Follow the steps on Microsoft's website to create a new channel within your Team.
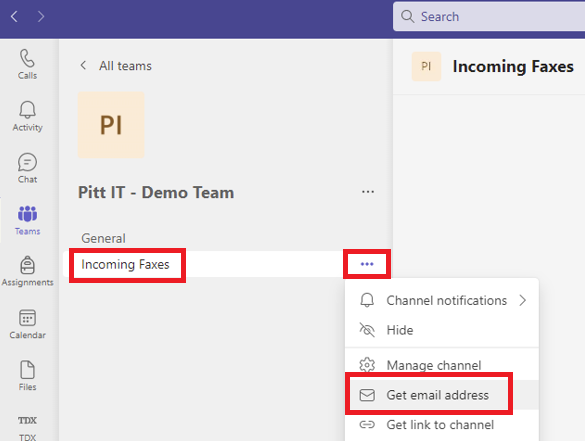
3. Hover over the name of your new channel. Click the ellipsis (...) to the right of the channel name and Get email address.
4. Click advanced settings.
5. Select Only email sent from these domains and add retarus.net to the list of domains.
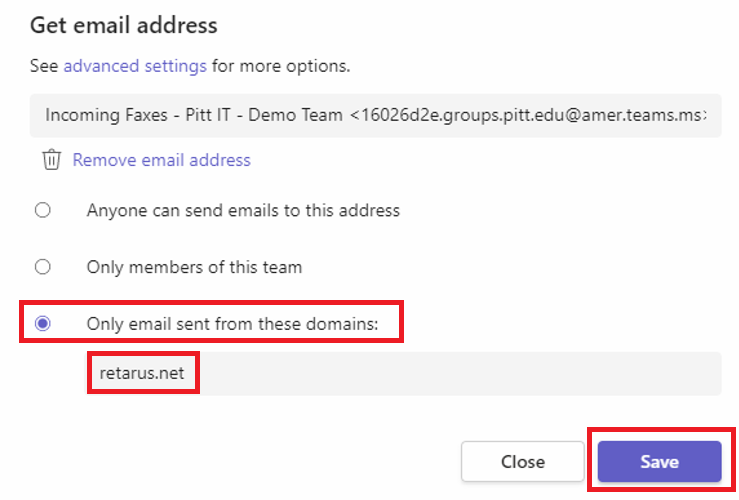
6. Click Save.
- Note: A Microsoft 365 Group is created for your Team, but it is hidden in Outlook by default. If you'd like access to the Microsoft 365 Group in Outlook, contact the Technology Help Desk.
Use a Microsoft 365 Group Email Address for Incoming Fax Messages
Use the Email Address of an Existing Microsoft 365 Group
Follow these steps to find the email address of an existing Microsoft 365 Group:
- Open Outlook.
- Ensure you are in Email view and not Calendar view.
- In the left-hand column where mail folders are displayed, navigate to the Groups heading and find the group you want to use.
- Click the group name to select it.
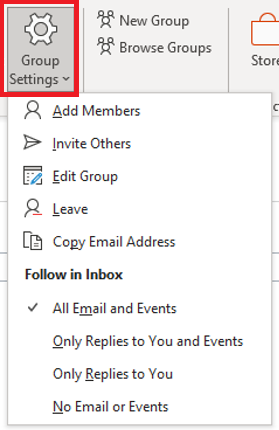
- Click on [Group Settings] in the ribbon bar and select Copy email address.
Create a New Microsoft 365 Group
Follow these steps to create a new Microsoft 365 Group and find its email address:
1. Open the Outlook desktop client.
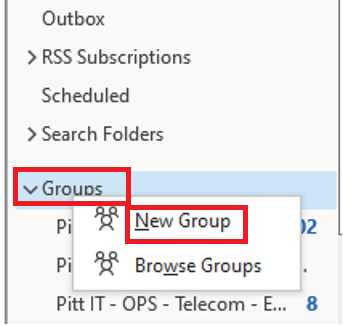
2. In the left-hand column where mail folders are displayed, right click on the Groups heading and select New Group.
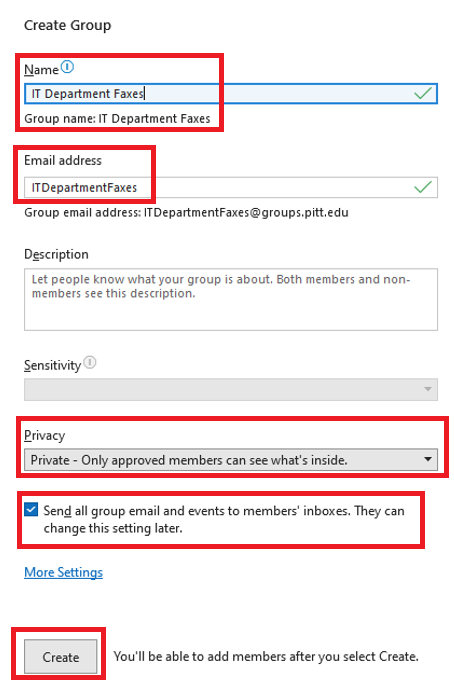
3. The Create Group window displays. Enter a name for the group (note that the email address will be based on the group's name).
4. Set Privacy to Private – Only approved members can see what’s inside.
5. If you would like all group members to receive a copy of incoming fax messages directly in their Inbox, leave the box checked next to Send all group email and events to member’s inboxes. Individual group members can change this setting on their account if they do not want to receive copies of every group message in their Inbox.
6. Make a note of the email address to share with Pitt IT, then click Create.
7. The Add Members window displays. Type the name of an individual you want to add to the group, then click their name from the list of matching results. Repeat the process for every person you want to add to the group. After all members have been added, be sure to click the Add Members button.
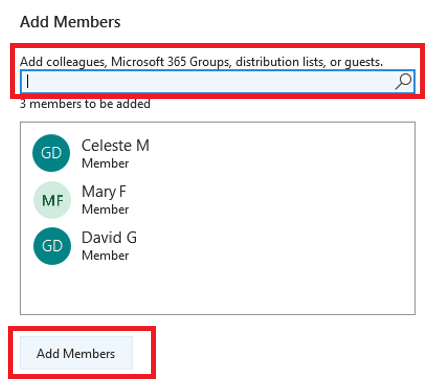
8. The group has been created and the members have been added.
- Note: Group owners can add members or update the group at any time. To do so, open the Group folder in Outlook and select Group Settings from the Ribbon menu.