You are here
Have Meeting, Will Register
One of the more common questions Pitt Information Technology fields is how to create a registration page for an online event or webinar, instead of manually inviting specific people via a meeting invite. With a publicly accessible registration page, you can create attention-grabbing promotional materials to attract a wider audience, as well as gather important info about participants and their interests, track who will be attending, and eliminate manual processing of RSVPs. You can create meeting registration pages in Teams, Zoom, and Qualtrics. Complete instructions are available online (see URLs below), but here’s a quick run-down of how to do it.
Feature Comparison | Teams Registration | Zoom Registration | Qualtrics Registration | Publicize
Feature Comparison
In general, you’ll create your event registration page directly in either Teams or Zoom. However, for more complicated events, events that require a participant questionnaire/survey, or events that will be hosted by another video service, you’ll want to use Qualtrics.
Pitt IT recommends using Microsoft Teams for internal staff/faculty meetings because of its integration with Outlook, while Zoom’s integration with Panopto makes it the preferred choice for online instruction. Before you dive into how to create a registration page, here’s a handy feature comparison to help you decide which app best fits the needs of your event.
Feature Comparison Chart
Feature Comparison Chart
|
Feature |
Teams |
Zoom |
Qualtrics |
|---|---|---|---|
|
Automatically creates meeting/webinar in Teams |
Y |
N |
N |
|
Automatically creates meeting/webinar in Zoom |
N |
Y |
N |
|
Can be used with other online meeting platforms |
N |
N |
Y |
|
Customizable registration page questions |
Y |
Y |
Y |
|
Customizable page formatting & branding |
Y |
Y (limited) |
Y |
|
Automatically sends invite to presenters |
Y |
Y |
Y |
|
Automatically sends confirmation email |
Y |
Y |
N (must be set up) |
|
Customizable confirmation email |
N |
Y (limited) |
Y (fully) |
|
Can create and send meeting invitation email |
N |
N |
Y |
|
Can create and send registration reminder email |
N |
N |
Y |
|
Can create and send event reminder email |
N |
Y (webinar) |
Y |
|
Can create and send followup email to registrants |
N |
Y (webinar) |
Y |
|
Can create and send separate followups to attendees and no-shows |
N |
Y (webinar) |
N |
|
Can have multiple meeting date/time options |
N |
Y |
Y |
|
Can accommodate additional options (e.g., meal choices, concurrent sessions, special needs) |
N |
N |
Y |
|
Can restrict the number of registrants |
N |
Y |
Y |
|
Can be used with in-person only events |
N |
N |
Y |
|
Can be used with hybrid (in person/online) events |
Y (reg page for online portion) |
N |
Y |
|
Can download registration report |
Y |
Y |
Y |
|
Can download attendance report |
Y (any time) |
Y (during event only) |
N |
Schedule a Teams Meeting with Registration
To create a registration page in Teams, you just need to select the Registration option, which uses an interface that is quite intuitive for Microsoft app users. You can create the registration page at the same time you create the Teams meeting, and then track registrants. After the event, download an attendance report, so you can see who came. Teams registration pages can only be used for a single meeting. If you create multiple options (for example, you hold three public information sessions people can choose from), you’ll need to create three separate meetings with individual registration pages.
Create a Teams Meeting with Registration Page
Create a Teams Meeting with Registration Page
- In Teams, click on the Calendar icon from the left navigation.
- Click on + New Meeting from the top right of the page.
- From the top navigation bar, click Require registration: and choose either “For people in your org” if it is limited to Pitt faculty, staff, and students or “For everyone”. The New Webinar window will open. (Meetings with registration are automatically called webinars.)
- Add your webinar details, including the title, date, time, location (if there is a physical option), and presenters. Note: This info is only for the calendar entry. It does not transfer to the registration page, so don’t spend time writing promotional copy here.
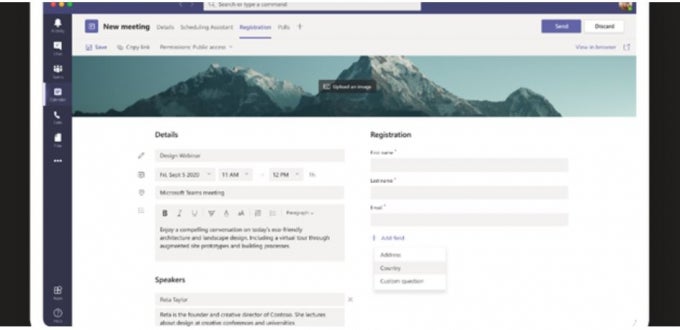
- Click on View registration form at the top of the page to customize the registration page.
Unfortunately, webinar details don’t automatically transition to the registration page. - Add the event title, date, and time. The Description field gives you many formatting options, including bold, italics, and bullets. You can add speaker names/bios, as well as a banner image for visual interest. Note that you cannot add location details here – registration pages are for the Teams online event option only.
- The registration page always requires first/last name and email address, but you can add other questions. Choose a commonly requested field or create custom questions. Whenever new questions are added, you can choose whether they are required for registration.
- Once you have completed your registration page, click Save from the top of the page.
- Click View in browser at the top of the page to preview the registration page. (If you didn’t click Save, the info you entered won’t appear. It’s not lost – it just doesn’t display in the preview.) Close the preview browser window when you’re done reviewing it.
- Click Copy registration link to copy the URL so you can add it to an email, website, or University Calendar entry.
- Once you’re done creating and saving the registration page, close the Registration window. You’ll return to the New Webinar window.
- Click Send from the top right to save the Webinar, add it to your calendar, and send an email invitation to the presenters.
- When people register for the session, it will automatically send a confirmation email that lets them add it to their Teams/Outlook calendar.
- If you need to make edits to the registration page or meeting after it was created, just open your Teams calendar, click on the meeting title (not on the Join link), and choose Edit. If you change the date or time, an update email will be sent to presenters and registered participants.
Schedule a Zoom Meeting with Registration
Zoom meetings and webinars have the option to require registration, which automatically generates a registration page. A Zoom registration page offers some formatting options, though not rich formatting like Teams. However, it creates the basic registration page on its own, transferring meeting information to the registration site. Zoom also has meeting and registration page information accessible from a single screen, which makes it a little easier to navigate.
Zoom can also create a registration page for recurring meetings, allowing participants to select from among several options on one page. This is super convenient, but it takes a little finagling to schedule the meetings if they don’t happen on a regular cadence.
Create a Zoom Meeting with Registration Page
Create a Zoom Meeting with Registration Page
- Navigate to pitt.zoom.us, select Sign In, and log in with your Pitt credentials.
- Click on Meetings or Webinars from the menu on the left, depending on which type of event you want and have permissions to schedule. (Note: the rest of these directions apply to scheduling a Meeting with registration. The process is nearly identical for Webinars.)
- Click + Schedule a Meeting from the top right corner
- Create your meeting, giving it a topic, date, time, etc. Enter the event description by clicking
+ Add Description. (This field always displays for Webinars.) - If there will be multiple instances of the same event, click the box beside Recurring Meeting.
- Pick the frequency that comes closest to how you are scheduling it, even if you’re not scheduling sessions on a regular cadence. For example, if you offer it twice a week for three weeks, choose weekly and pick a couple days.
- Alternatively, pick daily for as many sessions as you’re hosting.
- You can adjust the dates and times for subsequent sessions after the meeting series is scheduled.
- Click the box beside Registration required. If you have scheduled a recurring session, choose “Attendees need to register for each occurrence to attend” if attendees must pick only one session or “Attendees register once and can choose one or more occurrences to attend” if they can select multiple sessions.
- Once you’ve selected all your desired settings, click Save at the bottom of the page. (Note: you will edit the registration page after the meeting is saved.)
- If you click on the registration link listed in the saved meeting, you can see how the registration page looks.
- Click on Branding from the menu on the bottom half of the screen. From there, you can add a banner image that will display across the top of the registration page and/or a logo that will appear on the right, beside the copy.
- For a Meeting, click Registration from the menu at the bottom of the page, and then “Edit” beside Registration Options. For a Webinar, click the Invitations section, and then “Edit” beside Registration Settings.
- From here, you can choose your registration settings, as well as add additional registration fields or create custom questions. (By default, the registration form includes first/last name and email address.) Once you’ve selected all the options you want and set all your registration questions, click Save All.
- Webinars also let you add a design theme and speaker pictures/names/bios from the Branding section.
- You can also make some minor edits to the confirmation email sent to registrants from the Email Settings sections. Note that Webinars have several additional email options that you can select, including a reminder email that can go to registrants a few hours or days before the event and a follow up email for attendees and no-shows. The text of those can also be edited.
- If you need to edit the dates and times of any sessions, click on Meetings or Webinars from the left menu. Click “Edit” beside the session and choose “Edit This Occurrence” to edit that specific offering only.
- Change the date and time and click Save. Repeat for all instances until all session dates/times are correct. If you click the Registration link, you’ll see that the list of available sessions has been updated to reflect the new schedule.
Create a Qualtrics Registration Page
Pitt’s Online Survey System (Qualtrics) is also able to gather registrations for an event. To be honest, creating a simple event registration page using Qualtrics is more work than just using Teams or Zoom. So if you have a relatively simple event being hosted on those apps, consider using their built-in registration functionality.
However, if you need to create a registration page for an in-person event or an event hosted on another app (like Google Meet or Facebook Live), want to conduct a participant survey or questionnaire, or need to gather more complex registration information (e.g., an event with concurrent sessions or multiple events over several days), a Qualtrics survey becomes your go-to solution.
Create a Registration Page through Qualtrics
Create a Registration Page through Qualtrics
- Create any online meetings in whatever application you will be using. Be sure to copy and paste the meeting invite links for each session for use in confirmation emails.
- Navigate to pi.tt/qualtrics and click to log into Qualtrics with your Pitt credentials.
- Click on Create a new project from the left menu, and then select “Survey” from the “From scratch” section. Then click Get started from the bottom of the page.
- Give the project a name and click Create project.
- Then you can start adding questions. From the Builder column on the left, change the Question type to “Form field”.
- In the Builder window, click to edit the question to something like “Please provide your contact information”. Then add the labels for each field you want to include, such as First Name, Last Name, Email Address, and Department. (You can drag the text boxes to make them wider.)
- If there is other information you want to gather, click Add new question and select the appropriate Question type. For example, you can use “Multiple choice” to allow people to pick an available date or a concurrent session. Add questions as needed.
- If you want to cap the number of people who can register for a session (and stop displaying a choice if the maximum capacity has been met), you’ll need to employ the Quota display logic. This requires going to the Survey options tab, selecting “Quotas”, creating a Multiple Quota logic for the question, and then adding the Display Logic to each option on the Builder tab.
(See the Setting Up the Question section of the Appointment & Event Registration Surveys help page for step-by-step directions.) - Click on the Look and Feel tab, the third icon on the left. You can adjust the appearance of the survey here. From Themes, go to the “Presets” options, and select “Official University of Pittsburgh”. Then click Apply.
- You can send an automated confirmation email. That email can include Zoom or Teams meeting links for the chosen sessions.
(See the Email Confirmation section of the Qualtrics Appointment & Event Registration Surveys help page for step-by-step instructions.) - You can create a customized end-of-survey page, use the standard message (with or without their responses listed), or direct registrants to a URL once they’re done (for example, a page on the event site; just be sure the page they are redirected to includes a message that lets them know their registration was successful).
- Once you’ve completed your registration survey, click Preview to see how the page will look on a laptop or mobile device. Click Publish to make the registration page live. You can then include the link to the registration page in your promotional materials.
Learning the finer points of Qualtrics can be a challenge. Go to the Qualtrics Support Page for help articles. The Pitt IT Qualtrics page also has lots of helpful resources. In addition, Pitt IT offers live instructor-led training for Qualtrics through the Faculty & Staff Development Program. Keep your eyes open for the release of the Fall schedule so you can sign up for the training.
Publicize and Go
Once you’ve created your meeting and the registration page, it’s time to publicize your event so people can register. There are lots of ways to generate interest.
- If you have a mailing list for your customers, you can create a snazzy email about your event with a Register Now button that leads to your registration site.
- You can create a special event web page/site that links to the registration page.
- Have your department's Calendar Contact add the event to the University Calendar and add the registration URL to the Tickets and Registration tab.
- Get your event added to a departmental or University newsletter.
- Create social media posts to advertise the event.
Cast a wide net to get your audience excited to attend your event!
-- By Karen Beaudway, Pitt IT Blogger