Linux Timesharing / File Storage | Information Technology | University of Pittsburgh
!

You are here

Linux Timesharing / File Storage

Important: The Linux Timesharing Service replaced the previous Unix Timesharing Service, which will be retired at the close of the spring term in May 2023. .

Overview

We provide a Linux system for use by the University community available to all users with a valid University Computing Account.

Many schools at the University of Pittsburgh use the Linux Timesharing Service for research, classroom work, and teaching. It can be used to run specialty software applications for engineering and mathematics that require a Linux environment. The most popular system uses are for programming, creating a personal webpage, and statistical software. The Linux Timesharing Service has a default quota of 5 MB, but this quota may be increased using the Accounts Self-Service page.

To access this space, you must use one of two secure connection methods: SSH or SFTP.

  • SSH, which stands for Secure Shell, is a program that enables you to securely log in to a remote computer.
  • SFTP stands for secure file transfer protocol. It enables you to transfer files securely between two computers. If you use web authoring software, you must publish files using SFTP.
    Note: Please ensure that any clients you use to access Timesharing are configured to point to linux-ts.it.pitt.edu before May 2023.

It can also be used to access your disk space on the distributed network file storage system known as the Andrew File System (AFS).

Get Started 

Connecting for the First Time

The first time a server connection is made via SSH, SCP, or SFTP, you will be asked to accept the presented host key as valid before you log in. This security measure prevents man-in-the-middle attacks designed to maliciously obtain your password.

The host key should be accepted only if its fingerprint exactly matches the valid host key presented below

Note: There are multiple possible supported host key algorithms, so be sure to compare the appropriate algorithm name, fingerprint method (MD5 or SHA256) and the fingerprint when verifying the presented host key.

The following are valid host key fingerprints:


  • linux-ts.it.pitt.edu – ED25519    SHA256:L7NWogPp5FGdGOsPEdgcA+UB+LTR4DjxsOtqWB4SRI4
  • linux-ts.it.pitt.edu – ED25519    MD5:57:d5:9d:68:6f:bc:a5:29:9f:17:02:d2:08:15:6e:9c
  • linux-ts.it.pitt.edu – ECDSA       SHA256:NiqTfwMaiIgQHrzLIMWGx4cWozO+Lrsg4NfWINfTMq4
  • linux-ts.it.pitt.edu – ECDSA       MD5:ec:fe:bd:85:81:a6:8e:67:99:44:82:51:ec:9c:3d:12
  • linux-ts.it.pitt.edu – RSA            SHA256:qMocBTF76VZ7kLj61IrS/UNABZZA7m5AG4uRt868A3g
  • linux-ts.it.pitt.edu – RSA            MD5:25:a0:fb:13:71:a5:de:30:af:21:bb:84:0d:f3:fd:d8

Connection Locations

You may access the Linux server directly from within PittNet and while using Virtual Desktops for Remote Work or the Virtual Computing Lab. If you are connecting from outside PittNet, you will need to use the University’s preferred VPN solution, PittNet VPN (GlobalProtect), or the legacy PittNet VPN (Ivanti/Pulse Secure) service.

Connection Methods

Use one of the following four methods to connect and use the Linux Timesharing Service.

Windows: Using SSH and SFTP

You can use PuTTY to establish an SSH connection to the Linux Timesharing Service. A program called WinSCP can be used to establish an SFTP connection. This section explains how to connect to the Linux Timesharing Service with these two programs. 

Using PuTTY as an SSH Client

1.  If you do not already have PuTTY installed on your Windows computer, open a web browser to http://www.chiark.greenend.org.uk/~sgtatham/putty/download.htmlRight click the putty.exe file in the Binaries section and save the file to your desktop.

2.  Double-click the PuTTY icon on your desktop to launch it.

 PuTTY Icon

3.  You may get a security warning pop-up window asking if you want to run the software. If you do, click Run.

 Security Warning Pop Up

The PuTTY Configuration window will display. In the Host name field, type linux-ts.it.pitt.edu. Make sure SSH is selected as the Connection type. Enter Linux Timesharing under Saved Sessions and click Save. This will save your settings so you do not have to enter them each time you log in.

Note: After May 2023, the following host names associated with the Solaris-based Unix Timesharing Service will no longer work: unixs.cssd.pitt.edu, unix.cssd.pitt.edu, unixs1.cis.pitt.edu, and unixs.cis.pitt.edu. 

4.  Click the Linux Timesharing option and click Load. This will load your saved session. Next, click Open.

Note: The next time that you use PuTTY, you can simply Load and Open your Saved Session. You do not have to enter the Host Name each time.

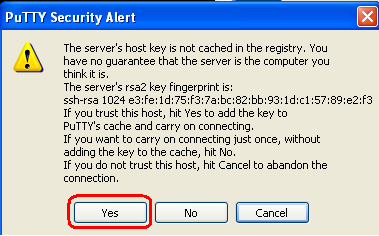
5.  The first time that you connect from your computer to a given host, you will see a security alert window like the one below. If the host fingerprint shown in the window matches the fingerprints listed under Connecting for the First Time, click Yes to accept the host key. Otherwise, click No or Cancel. This warning should not display again.

 PuTTY Security Alert

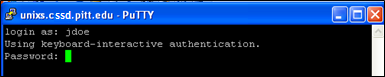
6.  Type your University Computing Account username and press the Enter key. Next, type your University Computing Account password and press the Enter key.

 PuTTY Login Screen

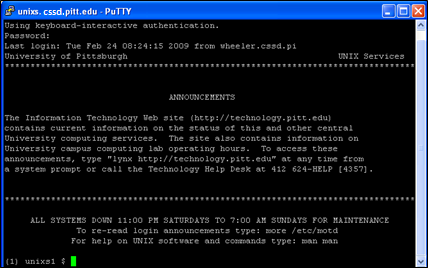
7.  The Linux Timesharing Service login window will display. You are now securely connected. 

 Unix Timesharing Window

Installing WinSCP for SFTP

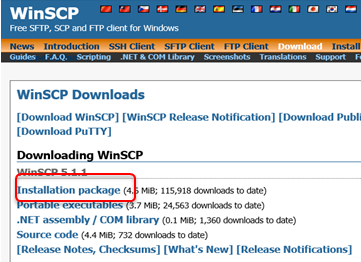
1.  Open a web browser to http://winscp.net/eng/download.php. Click the Installation package link in the Downloading WinSCP section.

 WinSCP Downloads List

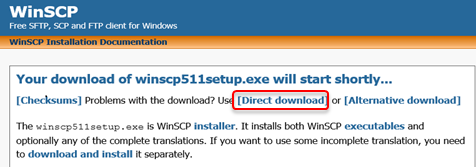
Your download should start automatically (Note: If it does not, click the Direct Download link on the page).

WinSCP Download Screen 

2. A pop-up window will ask if you want to run or save the application. Click Run

WinSCP Download Pop Up
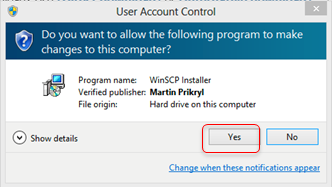
3.  Click Yes in the User Account Control pop-up that appears.

 User Account Control Pop Up

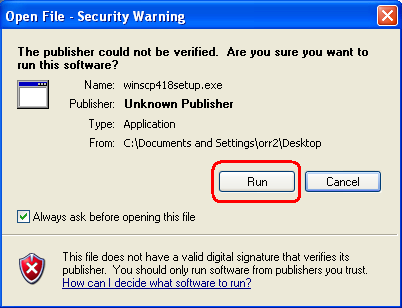
4.  A security warning may display asking if you want to run the software. Click Run.

 Security Warning

5.  Select the language for the installation and click OK. The WinSCP Setup Wizard will display. Click Next.

6.  Read the license agreement and click Next.

7.  Select Typical installation and click Next.

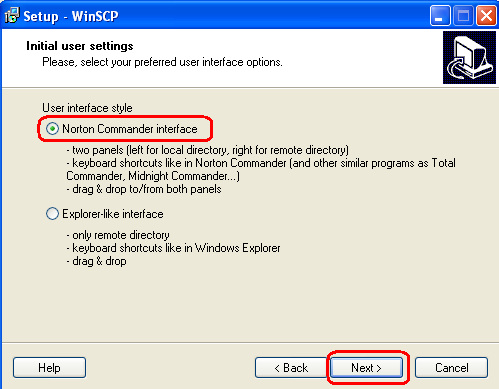
8.  Select Norton Commander Interface as the interface style and click Next

 WinSCP Set Up Wizard

9.  Click Install to begin the installation process. 

10.  When the installation has been completed, click the Finish button. 

Using WinSCP for SFTP

1.  Double-click the WinSCP icon on your desktop to open the program.

 WinSCP Icon

The WinSCP Login window will display. Enter linux-ts.it.pitt.edu in the Host name field. Enter your University Computing Account username and password where prompted. Leave the Port number set to 22. Ensure that the File protocol is set to SFTP and click Save. 

Note: After May 2023, the following host names associated with the Solaris-based Unix Timesharing Service will no longer work: unixs.cssd.pitt.edu, unix.cssd.pitt.edu, unixs1.cis.pitt.edu, and unixs.cis.pitt.edu.

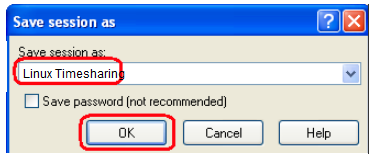
2.  Enter a name for your saved session (for example, Linux Timesharing) and click OK.


3.  Select your Unix Timesharing session and click Login.


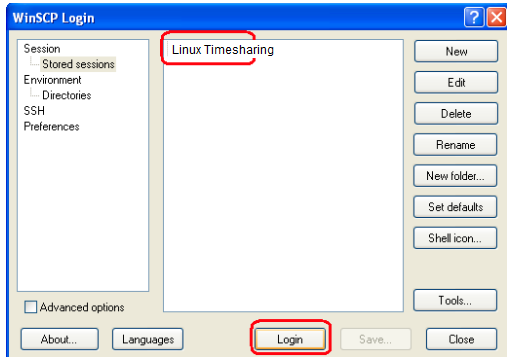
Note: The next time that you use WinSCP, you can simply select your stored session and click Login. You do not have to enter the Host Name each time.

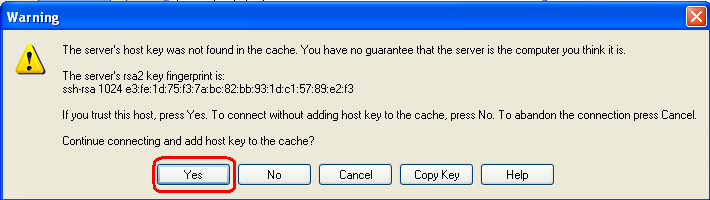
4.  The first time that you connect from your computer to a given host, you will see a security alert window like the one below. If the host fingerprint shown in the window matches the fingerprints listed under Connecting for the First Time, click Yes to accept the host key. Otherwise, click No or Cancel. This warning should not display again.

 WinSCP Warning Pop Up

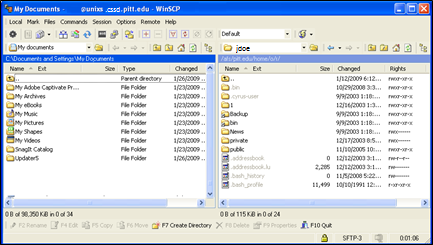
5.  You are now securely connected to the Linux Timesharing Service. You can copy files back and forth between your computer (left side of window) and the remote system (right side of window). 

 Unix Timesharing File List

Mac: Using SSH and SFTP

Macs have a built-in SSH client that can be used to access the Linux Timesharing Service. There is also a built-in SFTP capability that can be used to access the Linux Timesharing Service. Also, you can use an SFTP program called Fetch. The built-in utilities for Mac are already configured to use the secure SSH and SFTP connections. This section explains how to connect to the Linux Timesharing Service with these programs.

Using the Built-in SSH Utility

1.  Click the Finder menu, and select Applications. Double-click on the Utilities folder.

 Finder Menu

2.  Double-click the Terminal application to launch it.

3.  Type ssh username @ linux-ts.it.pitt.edu (where username represents your University Computing Account username) and press Enter.

      Note: After May 2023, the following host names associated with the Solaris-based Unix Timesharing Service will no longer work: unixs.cssd.pitt.edu, unix.cssd.pitt.edu, unixs1.cis.pitt.edu, and unixs.cis.pitt.edu:​

4.  The first time that you connect from your computer to a given host, you will see a warning window like the one below. If the host fingerprint shown in the window matches the fingerprints listed under Connecting for the First Time, answer Yes to accept the host key. Otherwise, answer No. This warning should not display again.

 Unix Terminal

5.  Type your University Computing Account password and press the Enter key.

6.  The Linux Timesharing Service login window will display. You are now securely connected. 

 Unix Timesharing Service Login Window

Using the Built-in SFTP Utility

1.  Click the Finder menu, and select Applications. Double-click on the Utilities folder.

2.  Double-click the Terminal application to launch it.

3.  Type sftp username @ linux-ts.it.pitt.edu (where username represents your University Computing Account username) and press Enter.     

4.  The first time that you connect from your computer to a given host, you will see a warning window like the one below. If the host fingerprint shown in the window matches the fingerprints listed under Connecting for the First Time, answer Yes to accept the host key. Otherwise, answer No. This warning should not display again.

5.  Type your University Computing Account password and press the Enter key.

6.  If you have successfully logged in, an sftp> prompt will display like the one below.

 Unix Terminal sftp> Prompt

Using Fetch for SFTP

If you use Fetch as an FTP client, complete the following steps to configure it for a secure SFTP connection. 

Note: If Fetch is not already installed on your Mac, you can download it free via the Software Download Service at Pitt.

1.  Go to the Applications folder and double-click the Fetch icon to launch the program. A New Connection window will display.

2.  In the Hostname field, type linux-ts.it.pitt.edu.

3.  In the Username field, type your University Computing Account username.

4.  Set the Connect using drop-down menu to SFTP.

5.  In the Password field, type your University Computing Account password.

6.  Click the Connect button.

     Note: The first time that you connect from your computer to a given host, you will see a security alert window like the one below. If the host fingerprint shown in the window matches the fingerprints listed under Connecting for the First Time, click Yes to accept the host key. Otherwise, click No or Cancel. This warning should not display again.

7.  When you have successfully connected, files on the remote system will appear in the window as shown below.


At this point, you can use the Path button to navigate through directories on the remote system. To begin downloading files from the remote system to your local system, select the file you wish to download. Then click the Get button. To begin uploading files to the remote system from your local system, select the file you wish to upload. Then click the Put button.

When you have completed your file transfer and you are ready to disconnect from the remote system, close the connection window.

Linux: Using SSH and SFTP

Linux has a built-in SSH client that can be used to access the Linux Timesharing Service. This built-in utility for Linux is already configured to use the secure SSH connection. Many Linux systems also include an SFTP client. This section explains how to connect to the Linux Timesharing Service with these programs. 

Accessing Linux Timesharing on Linux using the Built-in SSH Utility

A built-in SSH utility is included on Linux workstations. Use SSH instead of rlogin, rsh, or telnet to access the University’s Linux Timesharing Service.

1. After logging in to the Linux workstation, right-click on the desktop and select Open Terminal.

2. At the command prompt from the terminal window, type the following command (where username is your University Computing Account username) and then press Enter.

           ssh username @ linux-ts.it.pitt.edu

 3. The first time that you connect from your computer to a given host, you will see a warning window like the one below. If the host fingerprint shown in the window matches the fingerprints listed under Connecting for the First Time, answer Yes to accept the host key. Otherwise, answer No. This warning should not display again.

 Warning Message

4. You will be prompted for your password. Type your University Computing Account password and press Enter. You are now securely connected to the University’s Linux Timesharing Service.

5. To terminate your remote login session, type exit and press Enter.

Accessing Linux Timesharing on Linux using Built-in SFTP

A built-in SFTP utility is included on Linux workstations. Use SFTP instead of rlogin, rsh, or telnet to access the University’s Linux Timesharing Service.

1. After logging in to the Linux workstation, right-click on the desktop and select Open Terminal.

2. At the command prompt from the terminal window, type the following command (where username is your University Computing Account username) and then press Enter.

           sftp username @ linux-ts.it.pitt.edu

3. The first time that you connect from your computer to a given host, you will see a warning window like the one below. If the host fingerprint shown in the window matches the fingerprints listed under Connecting for the First Time, answer Yes to accept the host key. Otherwise, answer No. This warning should not display again.

 Warning Message

4. You will be prompted for your password. Type your University Computing Account password and press Enter. You are now securely connected to the University’s Linux Timesharing Service.

5. To terminate your remote login session, type exit and press Enter.

General Configuration: Using SSH and SFTP

If you use another software client that requires FTP, such as web authoring software, you will need to change its settings to use SFTP. Similarly, you will need to update the settings of any telnet client so that it uses SSH. This section describes the settings you will need to use.

Instructions for SSH Utilities

Use the following settings to establish an SSH connection to the Linux Timesharing Service.

The first time that you connect from your computer to a given host, you will see a warning window. If the host fingerprint shown in the window matches the fingerprints listed under Connecting for the First Time, accept the host key. Otherwise, do not connect. This warning should not display again.

  • Hostname: linux-ts.it.pitt.edu
  • Port: 22
  • Connection type: SSH
  • Username: Your University Computing Account username
  • Password: Your University Computing Account password

Instructions for SFTP Utilities

Use the following settings to establish an SFTP connection to the Linux Timesharing Service.

  • Hostname: linux-ts.it.pitt.edu
  • Port: 22
  • File Protocol: SFTP
  • Username: Your University Computing Account username
  • Password: Your University Computing Account password