Overview
Your University Computing Account gives you access to space in the Andrew File System (AFS), including space where you may host a personal webpage. The first step is to create your webpages using Hypertext Markup Language (HTML). This help sheets covers some of the basics of HTML. More information on HTML can be found in the brief guide to HTML hosted by the World Wide Web Consortium.
After you have created your webpages using HTML, you will need to upload them to a location on AFS where others can view them. For detailed instructions, refer to our help sheet titled Creating Your Own Website.
Detail
HTML Basics
HTML is based in plain text and does not require a special application to create it, although many helpful HTML authoring programs exist. This help sheet assumes that you are using a text editor such as Notepad. If you are using an HTML authoring program such as Dreamweaver, you should refer to the program's documentation and internal help.
HTML uses a simple set of codes known as "tags." Tags make plain text appear in a formatted form (such as bold or italics) when the document is viewed by a web browser. Tags are marked by the angle brackets < and >.
Most tags work as part of a set that contains an opening tag and a closing tag. Opening tags, <tag>, start a particular feature, and closing tags, </tag>, close the feature. For example, if you want text to display in boldface, you will need an opening <b> tag and a closing </b> tag. It is important to keep track of your opening and closing tags. If you forget to close a tag, you can end up with improper formatting throughout your document. HTML tags can nest inside of each other, so you can use multiple kinds of formatting at once.
Note: Not all tags require closing tags. Some are stand-alone tags. Many people use closing tags with stand-alone tags in order to make their HTML easier for others to read. Or so that they do not accidentally forget a necessary closing tag. Some HTML authoring programs will automatically remove or insert these extra closing tags, and web browsers will ignore the tags when displaying pages.
Required Tags
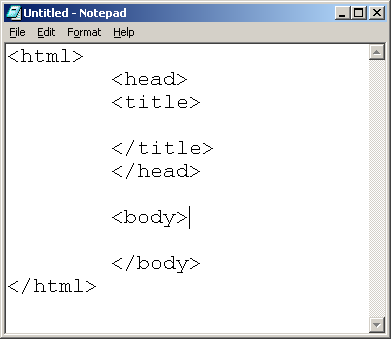
When writing your webpage, first set up the opening and closing tags required for web browsers to understand the document properly.
|
<html>...</html> mark the beginning and end of the entire document, and tell the web browser to display the file as HTML instead of in some other format. All other tags should be nested inside the <html> tags.
|
|
<head>...</head> create a header for your page. They contain the <title> tags. In more advanced pages, the header may also contain other information such as search engine keywords or Javascript.
|
|
<title>...</title> create a title which displays at the top of the browser window. They must be nested inside of a <head> tag.
|
|
<body>...</body> mark the beginning and end of the visible part of the document, the part displayed inside the window of the web browser. Any visible elements, such as text and graphics, must be nested inside the <body> tag. The body tag can have certain properties set, such as background color. For example, to set a page background to white, use the tag <body bgcolor="white">.
|
Browsers use the <html>, <head>, <title>, and <body> tags to determine the basic look of a page. These elements must be nested as shown or the browser will not interpret them correctly.
Formatting and Spacing Tags
Web browsers do not display text exactly as it appears in the source HTML file. In order to have a web browser display formatting such as headers, bold, or italics, the text you want to format must be enclosed in formatting tags. You will not be able to see the tags themselves when you view the file through the web browser.
|
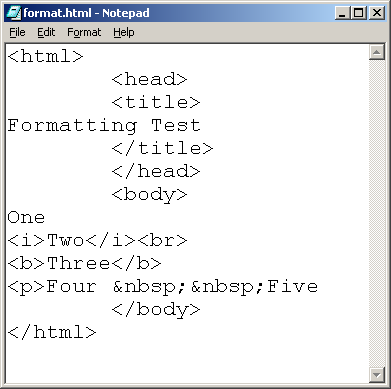
<h1>...</h1> is the largest header tag. It is often used to put a title across the top of a page.
|
|
<h2>...</h2> and <h3>...</h3>are smaller headers often used to set off subsections.
|
|
<b>...</b> will bold text.
|
|
<i>...</i> will italicize text.
|
Web browsers also ignore more than one space between words or after punctuation, and any blank spaces between lines. There are three tags you can use to manage how your text is laid out once it is viewed with a web browser.
|
<br> inserts a line break and starts the following text on a new line. This tag does not require a closing tag.
|
|
<p> inserts a full paragraph break, leaving a blank line between the preceding text and the following text. This tag does not require a closing tag, but many people use a closing </p> to make their code more understandable to others.
|
|
<pre>...</pre> indicate to the browser that the text is pre-formatted and should be displayed exactly as it appears in the source file. Text enclosed in <pre> tags will not show any formatting such as bold or italics, and is displayed in a fixed-width font such as Courier. Some web authoring programs will allow you to link pre-formatted text, but many will not.
|
In addition to the tags, you can use a special character called a non-breaking space to add more spaces between words or after punctuation. To use a non-breaking space, type where you would like the space to appear.
The following HTML:
Generates the following browser output:
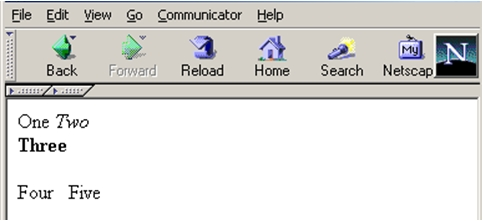
Notice the multiple blank spaces between "Four" and "Five."
Creating Lists
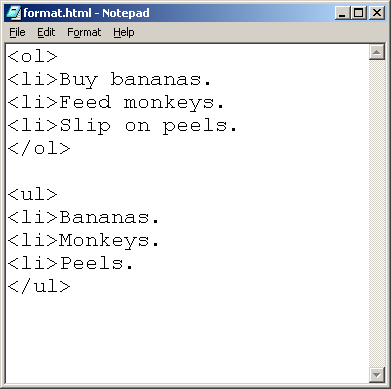
There are two kinds of lists that people usually want to create on webpages: numbered lists and bulleted lists. HTML calls these lists "ordered lists" and "unordered lists."
|
<ol>...</ol> sets up an ordered (numbered) list.
|
|
<ul>...</ul> sets up an unordered (bulleted) list.
|
|
<li> marks off the items in the list. This tag does not require a closing tag. As with the <p> tag, many people do use a closing </li> their code more understandable to others.
|
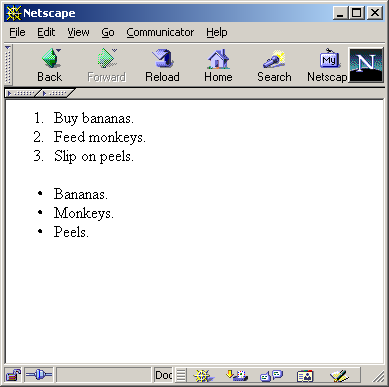
The following HTML:
Generates the following browser output:
Linking to Other Documents
HTML allows you to create what are called hypertext links to other files on the web.
|
<a>...</a> creates a link. You need to specify where the link should go within the opening tag. To specify the link address, you use the href parameter inside the <a> tag.
|
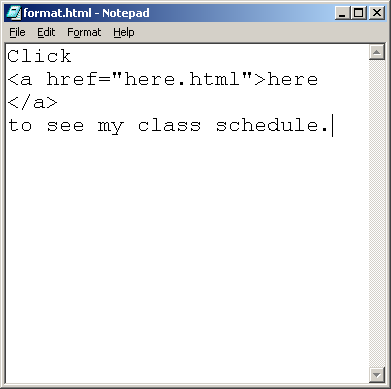
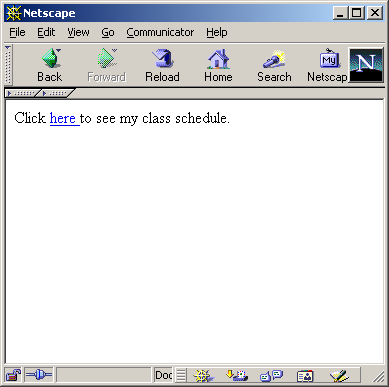
The following HTML:
Generates the following browser output:
In this instance, the file here.html must be in the same directory as the file it is linked from. This is called a relative link, since it uses the location of the two files relative to each other to locate the linked file. You can use relative links to any files inside your public/html directory, including subdirectories.
Note: if the file is in a subdirectory of public/html, you will have to specify the subdirectory or directories, separated with a slash. For example, <a href="class/schedule/here.html"> would look in the subdirectory class, then in the schedule directory inside of class, and then look for here.html.
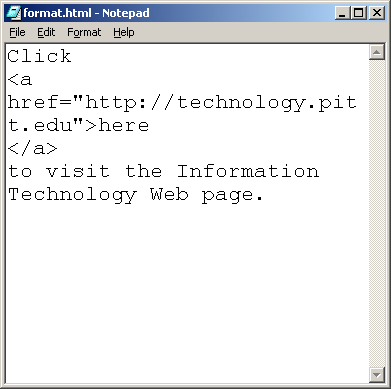
If you want to link to a document not in your AFS space, you will have to enter the full location of the document in the HTML code. This includes the http:// at the beginning of the URL. These links are called absolute links, because rather than using relative position, they use the full (absolute) location of the file on the web.
Note: The code for a link can be broken up over several lines, and can contain multiple words and images. Remember that unless there is a <br> or <p> tag, the web browser will ignore all line breaks. So, the <a> tag (or any other tag) will not be broken by being spread over multiple lines.
IMPORTANT! Remember to close your link tags. If you fail to insert the closing </a> tag, everything that follows the opening <a href="...> tag will be the clickable link.
Email Links
Email links use the same tags as regular links. However, instead of entering a URL beginning with http:// inside the <a href="...> tag, you enter an email address beginning with mailto:.
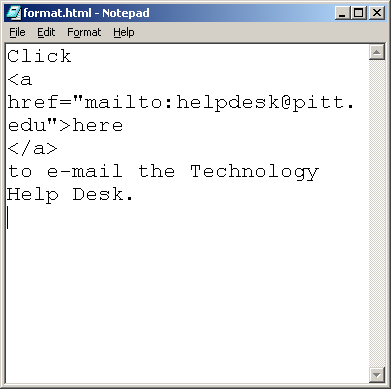
Many people will type in the email address as the linked word, so that readers can either write down the email address or print the page.
Including Images
Images on the web are usually in one of two formats: CompuServe Graphic Interchange Format (GIF) and Joint Photographic Experts Group (JPEG) format. You can identify these files by the extensions .gif and .jpg (or .jpeg).
Image files, like your other files, need to be in your public/html directory for the University's web servers to access them. You will probably want to use an FTP program to upload the files to your directory.
Once the file is uploaded, you can either link to it as you would to any other file, or you can embed it into a webpage.
|
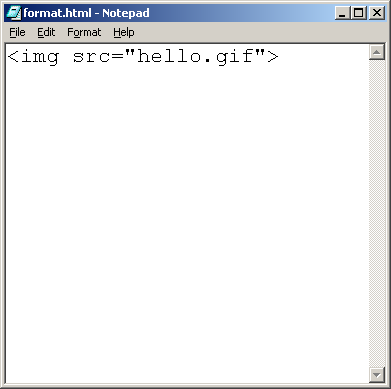
<img> can be used to embed a file into a page. Like the <a> tag, you must tell it where to find the file to embed. You do this by setting the src parameter. The <img> tag does not need a closing tag.
|
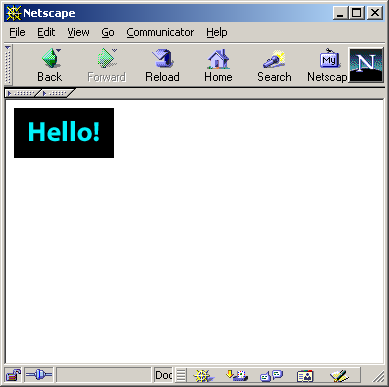
The following HTML:
Generates the following browser output:
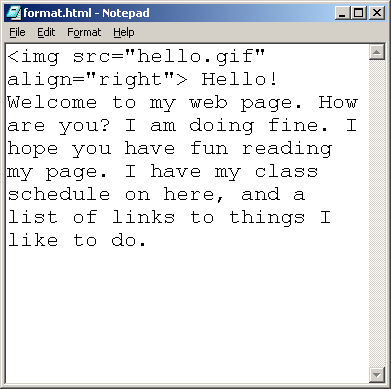
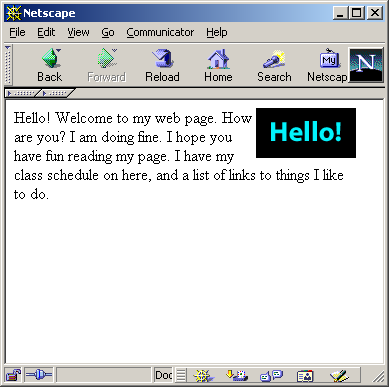
Many people place <p> tags before and after <img> tags so that text does not run into the image. You can also use the align parameter to wrap text around an image. The following HTML:
Generates the following browser output:
Viewing Your Webpages
Once you have created your pages, upload them to an HTML directory on the Andrew File System (AFS) using the instructions in our help sheet Creating Your Own Website.
After you upload your personal webpages to AFS, anyone can view your website at http://www.pitt.edu/~username (where username is your University Computing Account username). For example, if your University Computing Account username was jdoe, you would view your website at http://www.pitt.edu/~jdoe.
Note: web users will get a "directory listing denied" message if they try to view directories on the Pitt web servers that do not have index.html files. You should create an index.html file in your public/html directory and in all of its subdirectories, with links to all of the files you want people to be able to access.